Showing posts with label distressed furniture. Show all posts

Monday, July 6, 2015

Dining Room Table Makeover


Happy summer!  I hope your summer is going well!  I have been busy hanging out with my boys and redoing my dining room table. 

Have you ever looked at your furniture and just wanted something different?  

I used to love my dining room table.  I bought the table for my first house.  It was an older house and the naughty wood table looked perfect.  But, it has been awhile since I bought it, and my house has changed.  I want something different.

So...

project makeover dining room table begins!

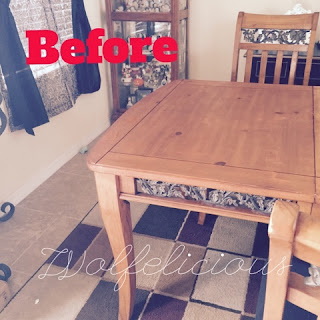
Here is my my lovely table. 
(Sorry I forgot to take a picture of the whole table so I had to take half of the table since one side is already stripped.)


photo of dining room table wolfelicious

Nothing wrong with the table, but I just wanted something different. 

I started by stripping the table.  I used Citristrip.  It made it super easy to do.  Spray on and wait 30 minutes.  Scrape off.  Easy Peasy. 
photo of dining room table wolfelicious

Then my hubby added a filler to the decorative groove.  I have hated the decorative groove since I bought it.  Food has always gotten stuck in the groove.  Gross!!

photo of dining room table wolfelicious

Filled!  Wahoo!!
photo of dining room table wolfelicious

Next, the hubby added a cherry stain to the table.  I painted the legs  white.

photo of dining room table wolfelicious

I also painted the chairs white. 

photo of dining room table wolfelicious

Next, was my favorite part.  I distressed the white part of the table and the chairs.

photo of dining room table wolfelicious

Last, I waxed the painted parts and hubby put poly on the table top.

photo of dining room table wolfelicious


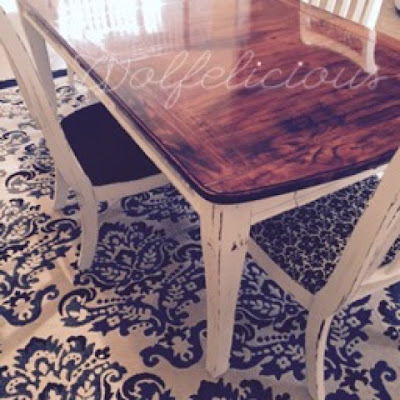
Ta-da!!!  It is all finished!

photo of dining room table wolfelicious

Now, I need to figure out what I am going to put on the middle of the table. 

photo of dining room table wolfelicious

Here are a couple more pictures of the table and chairs so you can see the distressed parts.  I don't think the pictures do it justice.  
photo of dining room table wolfelicious

We also added new coverings to the seat cushions.  2 black and 2 in the damask print. 

photo of dining room table wolfelicious


photo of dining room table wolfelicious

Top of table. 

photo of dining room table wolfelicious


photo of dining room table wolfelicious


My new, but old table.  Here are a few more pictures of it. 
photo of dining room table wolfelicious


photo of dining room table wolfelicious


photo of dining room table wolfeliciousphoto of dining room table wolfelicious
I love how it turned out.  It goes great with my black distressed buffet table.  Now I need to paint my curio cabinet. 
I hope you have enjoyed my makeover.

Update: I've added a center piece to the table.  My mom made the flower arrangement.  I love how it turned out.


Want more makeovers?  Check out my distressed buffet table and my distressed coffee table.

Thanks for stopping by!!

Have a Wolfelicious day!


Have a Wolfelicious day!

Check out my TPT Store
     Pre-K, Kindergarten, First, Second, Third, Fourth, Fifth, Sixth, Seventh, Eighth, Ninth, Tenth, Eleventh, Twelfth, Higher Education, Adult Education, Homeschooler, Staff - TeachersPayTeachers.com


Monday, June 23, 2014

Distressed Furniture using Chalk Paint

My summer vacay is going great!!  I love getting time to spend with my boys and doing whatever I want all day long.
Photo of Wolfelicious Distressed Furniture

A couple years ago I got the buzz to redo a piece of furniture in my house.  I love the distressed look so I decided to take my buffet table and distress it.  Well, it was a lot of work, but I LOVE how it turned out.  Check out the post here.  When I heard about others using Chalk Paint to distress furniture, I found some furniture that I wanted to change and got started creating.  

Chalk paint allows you to just paint your item instead of priming and sanding.  Fewer steps involved with Chalk Paint so furniture is finished faster.  Win! Win!

Instead of buying the expensive Chalk Paint, I decided to make my own.  I used Plaster of Paris. (I got mine at Micheal's and used a 40% off coupon).  I mixed about 2 1/2 tablespoons of Plaster of Paris with some water.  Once the clumps were out I mixed that concoction with one cup of latex paint.  Then I applied it with a brush.  Easy peasy lemon squeezey.   I applied two coats of paint before I distressed it.  After I distressed the furniture I either used wax or poly on the top.  

Here are some pictures of the furniture I did.  I am super excited to show you.  The bad news is that the pictures don't do the furniture justice.  The furniture looks  tons better in person. 

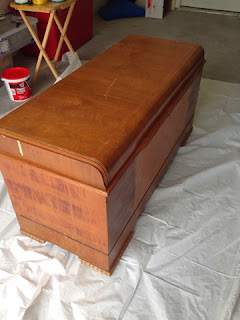
Chest-before

Photo of Wolfelicious Chest


Photo of Wolfelicious Chest

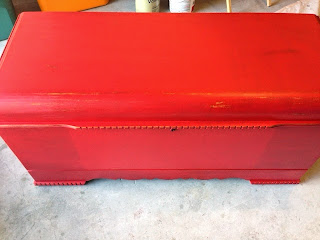
Chest- After
Note- the red seems really bright in the picture.  Live in person it is not as bright.

                                     Photo of Wolfelicious Chest

                                      Photo of Wolfelicious Chest


Photo of Wolfelicious Distressed Furniture

Photo of Wolfelicious Distressed Furniture


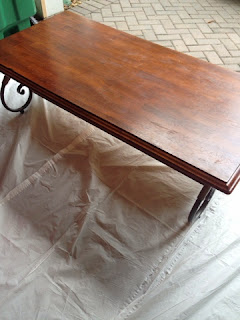
Coffee Table and Side Tables- Before

Photo of Wolfelicious Table

Coffee Table and Side Tables- After

Photo of Wolfelicious Table


Photo of Wolfelicious Table


Photo of Wolfelicious Table


Photo of Wolfelicious Distressed Furniture
I love how the tables turned out!  Again, I wish the pictures captured how great they look, but you do get an idea of how they look.  The Chalk Paint made fewer steps in creating my look for my furniture.

Thanks for stopping by!


Have a Wolfelicious day!

Also, for the rest of the month of June I am offering a FREE half Jamberry nail wrap for every purchase!!


Tuesday, June 12, 2012

Distressed Buffet Table Tutorial

I am linking up with Third Grade is a Hoot for her Pintervention Party.
 
My summer break has begun!  Woohoo!!  Boy oh boy do I have so many things I want to do.  One thing I wanted to try was to distress one of my tables.  I have seen this style of tables all over the internet and blogs.  It seems like the latest style.  I have seen some that are really distressed while others are barely distressed at all.  I loved this look and I wanted to try it.  I was wanting a change in my dinning room so I thought, I should distress something. So...

I decided to give it a try!  

Crossing my fingers that I wouldn't ruin my furniture,  I decided to distress my buffet table.  Here is how it turned out.
All finished refurbished buffet table with decor.
Well, what do you think?  I LOVE it!!  I think it turned out so well.  I am ready to do another piece.  Any takers?  (hehe)

This is how I made it.

What you need:
*Sand paper/sanding block - the 180 kind and 60 kind.
*Kilz Original Oil Based Primer
*Sponge Roller
*Paint of your choice- a semi gloss or satin works the best.
*Wood stain marker pen
*Minwax Paste Finishing Wax
*Cheese Cloth
*Drop Cloth


Before
First you need to take off all the hardware.  Then you are going to sand the table.  You can do this by hand or a power hand sander.  I actually went to The Home Depot and bought a power hand sander because it was taking forever just doing it by my hand.
Sanded table

Next you need to prime the piece of furniture.  I used a sponge roller so I didn't get brush stroke marks.
Table painted with primer.
Allow the primer to dry. Then sand with a fine grit sand paper.  Wipe the dust off really well.  

Next paint with an latex interior satin or semi-gloss paint.  I had Lowes mix a black paint for me in satin.  I painted the furniture using a sponge roller to avoid stroke marks.  Once the piece dried I sanded it with a fine grit sand paper.
Sanded black paint.  Sorry Liam wanted to get in this picture. As you can tell he dressed himself for the day.
 Next, I dusted off the piece really well and applied another coat of paint.
2 coats of black paint.

You may need to apply another coat of paint.  I actually didn't think my piece needed another coat so I moved on to the next step.  If yours does need another coat you would need to sand it again.  Wipe it clean.

Next using a fine grit sand paper you are going to distress the piece.  Only sanding on the edges until the wood grain shows through.  You want to make sure you sand through the primer. (see pictures at the bottom to see how I sanded mine)

Now you are going to use a stain marker to stain the wood on the edges that is showing through.  Wipe the extra stain off with a clean cloth. (I actually just used a paper towel)  

Using marker to go over bare wood.

Wiping marker.

Next use a cheese cloth to apply the wax.  Fold the cloth and put the wax inside so it is inside 2 layers of the cloth.  This helps for an even coat.  Let the piece sit there for 15-20 minutes.
Minwax Paste Finishing Wax
Waxing table
Once the time is up, buff using a clean cheese cloth until a shiny black finish appears.  Wait one day and repeat this process.

Then guess what?!!  You have made a distressed piece of furniture.  Congratulations.

Here is my finished table.
Side view of finished table


Side view of finished table
It's okay, keep looking.  Pick your jaw up off the floor.  I know, I know. it is gorgeous.  :)

Ta-da!!
Front view of table

And with my new decor on it.
All finished refurbished buffet table with decor.


Kindergarten, 2nd - Reading, Education - TeachersPayTeachers.com